

Overlay widgets and theme packs
Add widgets to an overlay scene, restyle it with theme packs and saved looks, and connect goals, votes, tallies and subathons to your stream.
Live and chatLast updated
Widgets are the pieces you put in an Overlay studio scene: timers, goals, polls, chat, pictures and more. This guide covers adding them, restyling a whole scene with a theme pack or a saved look, and the widgets that have settings of their own.
Add compatible third-party widgets to the same scene with a Web page layer.
Add to scene#
Add to scene is where everything that can go in a scene lives. Open it from + in Layers, or from the button on an empty scene.
- Pick a group on the left: All, Alerts, Goals and timers, Chat and events, Interactive or Text and media. The number beside each is how many widgets it holds.
- Type in Search widgets and theme packs to narrow the list. The counts follow what you type.
- Choose Add on a widget. It joins the scene on top, ready to move.
The window keeps a fixed height. The groups and the widgets scroll separately, and Import a widget and Saved looks stay at the foot of the group list.
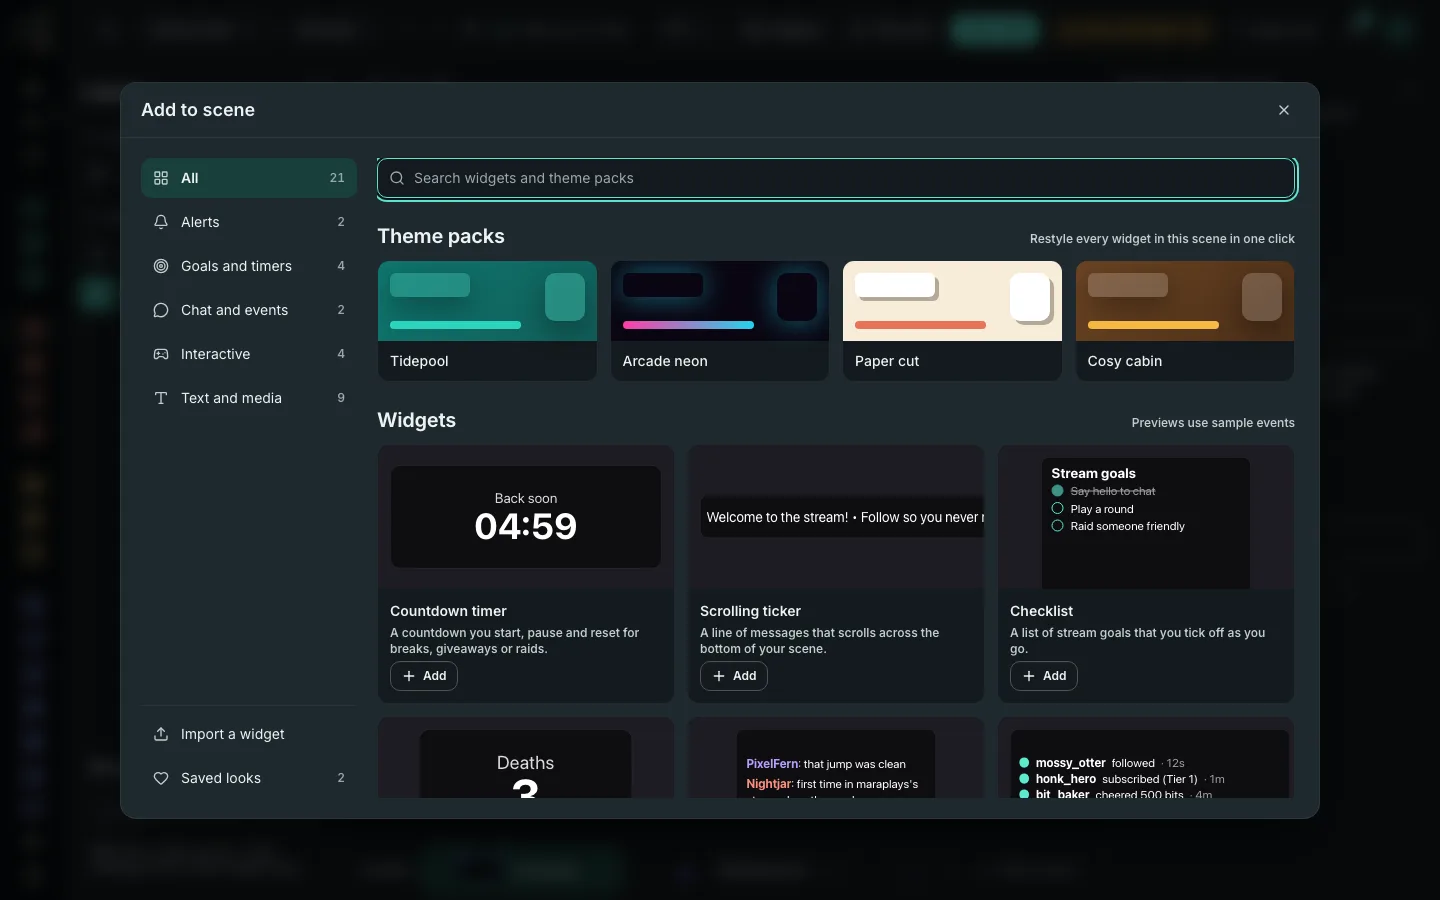
Each card shows an example of how the widget looks on stream, and a note says Previews use sample events. Some previews use your channel name and scene colour. A small New chip marks widgets added recently. Widgets you already made that are not in this scene are under Already created. Alerts and sound alerts are linked from the ones you already have. If you haven't set them up, the card links to their settings.
Goose Quest#
With Goose Quest enabled, choose Interactive > Goose Quest > Add. Bearsong makes the overlay the first time and reuses it in any other scenes you add it to. Select Play the sample game to preview a spawn, a catch, a boss fight and a tier up. The sample runs in Studio, even without Twitch connected. Your OBS source shows events from the real game.
Every Goose Quest card has the same shape: the goose from your cards on the left, in a pose for the moment (honking for a spawn or a boss, chasing for a hot streak, ringing its bell for a catch or a tier up, standing when a goose gets away), and the words on the right. Change them under Content:
- Card style: light or dark cards.
- Corner: where the cards stack. Bottom left is the default.
- Card size: from 75% to 125%.
- Catches stay up for: 4 to 20 seconds, for catches and season tier ups.
- Cards to show: switch off goose spawns, catches and escapes, boss fights, hot streak bounties or season tier ups.
- Goose art and Rarity: hide the goose, or the rarity name and colour of a catch.
- Goose faces: left, as drawn, or right, mirrored. Shown while Goose art is on.
These settings apply wherever the widget is used. Theme packs and saved looks leave Goose Quest as it is.
For more than these settings, restyle the cards with your own CSS under Style > Custom CSS. Custom CSS for overlays lists the card class names, the custom properties such as --gq-accent, and examples to copy. Every other widget has a Custom CSS box too.
Theme packs#
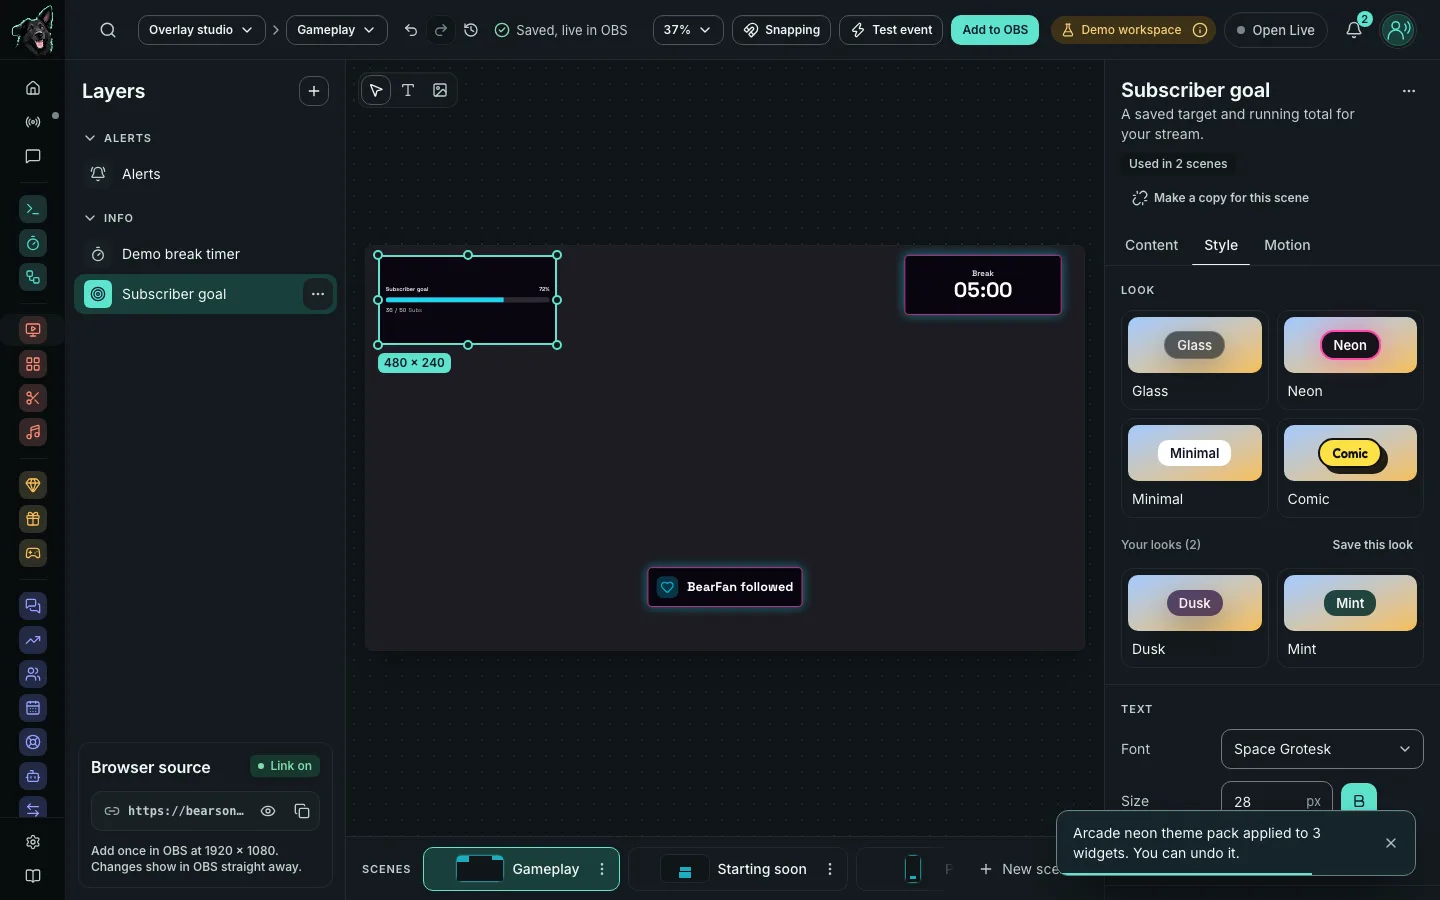
A theme pack restyles every widget in the scene in one step: Tidepool, Arcade neon, Paper cut and Cosy cabin. It sets fonts, colours, corners, borders and shadows, and leaves what a widget says and where it sits alone. A pack shows In use when every widget it changes already matches. Undo (Cmd or Ctrl and Z) puts the whole scene back in one step. Widgets with no look of their own, such as images and sound alerts, are left as they are.
Make your own theme pack#
A theme pack styles a whole scene; a saved look styles one widget. To make your own pack, open Add to scene and choose New theme pack beside the theme packs. Start from one of the built in packs (or a plain dark one), name it, and set:
- Colours: text, accent and background (with how see-through it is).
- Type: the font, and bold text.
- Shape: corners, border and its colour, blur and shadow.
- Motion: switch on Give every widget the same motion to set every widget's entrance, exit, loop and timing. Leave it off to keep each widget's own motion.
- Per widget: give alerts, timers, goal bars or the chat box their own text, accent and background colours. Everything else still comes from the pack.
The preview on the right shows a sample chat box, goal bar and follow alert in your pack as you change it. Save it and it sits beside the built in packs; click it to restyle the scene, as one step you can undo. Each of your packs has a ⋯ menu with Edit, Export, Duplicate and Delete. Export saves the pack as a small .bearsong-theme.json file you can keep or share; Import pack beside New theme pack reads one back and opens it in the builder so you can check it before saving. Only the pack's colours, type, shape, motion and per widget colours are read from a file, and anything the file leaves out starts from a plain dark pack. A file that carries custom CSS is refused. A name you already use gets (imported) after it. Deleting a pack leaves scenes that already use it as they are. A workspace can keep 20 theme packs. Theme packs do not carry custom CSS: add CSS to a widget, or keep it in a saved look.
Saved looks#
A look is a set of style settings you keep with a name. Keep up to 50.
- Select a widget and open Style.
- Change the style, then choose Save this look and name it.
- To use it, choose it under Your looks in Style, or choose Saved looks in Add to scene to restyle the whole scene with it. The bin beside a look deletes it. Widgets that already use it keep their style.
If your looks were changed somewhere else, the save is refused and the list reloads, so nothing is lost.
Widgets you can start from#
| Widget | What it shows |
|---|---|
| Countdown timer | A countdown you start, pause and reset for breaks, giveaways or raids. |
| Scrolling ticker | A line of messages that scrolls across the bottom of your scene. |
| Checklist | A list of stream goals that you tick off as you go. |
| Counter display | Shows a number on stream, such as deaths or wins, counted by hand or following a chat counter. |
| Voting bars | Bars that show how many votes each option has, added by hand or counted from chat or a Twitch poll. |
| Raffle wheel | A wheel that spins to pick a prize or a winner. |
| Goal bar | A saved target and a running total, added by hand, counted from new followers, subscriptions or bits, or following a chat counter. |
| Text block | A message placed anywhere in your scene. |
| Pop-up message | A pop-up message you show and hide by hand. |
| Spotlight | A featured message with an optional image. |
| Carousel | Named slides shown one at a time. |
| Shelf and Stack | Collections of saved messages and images. |
| Shape, Image and Sticker | Shapes to frame your scene, and images you uploaded or link to. |
Pictures#
Image, Sticker, Spotlight, Carousel and Shelf can show a picture. In the Content tab, under Image:
- Drop a file on the box, or choose it. PNG, JPEG, WebP and GIF work.
- Wait for Uploading to finish. The picture is then chosen for you.
- To use another one, pick it from the library under the box. The bin on a picture deletes it, after a check.
Pictures bigger than the limit are shrunk before they are sent: up to 4096 pixels on the longest side and about 4.4 MB. A GIF can't be shrunk, so a GIF over the limit is refused. You keep up to 100 pictures. Pictures belong to the widget you uploaded them to, and a copy of the widget gets its own copies. OBS reads them through the scene or widget link, so you don't need to do anything extra.
You can still paste an HTTPS image address instead. The Image tool on the stage (or the I key) adds an Image widget where you click on the stage. If the page says image uploads are not switched on, the address box still works. Alerts take a picture for each alert type in Overlay studio > Alerts.
Chat box#
The chat box shows your Twitch chat on stream. Chat appears as it is sent, and a fresh load of the source starts with the most recent messages.
- In Layers, choose + and pick Chat box under Chat and events.
- Choose your options in the Content tab.
- Add the scene to OBS.
Your options in the Content tab:
- Show: badges, and emotes as pictures. With emotes off, their names appear as text.
- Hide: messages that start with
!, and messages from the bot names you list, one per line. New chat boxes start with common bots such as Nightbot and StreamElements. - Blocked words: one per line. A message that contains any of them is hidden.
- Keep each message for: a number of seconds, after which the message fades away. Use 0 to keep messages until newer ones push them out. If your device asks for reduced motion, messages leave without fading.
- Messages shown: from 5 to 30.
The filters apply as the chat box draws, so a change shows up at once. The chat box is also checked by On-screen text, which hides viewer text by level and has its own link in these settings. Messages that moderators delete, and messages from someone who is timed out or banned, leave the chat box too. Under Live controls, Send test message adds a marked sample message so you can check the look without waiting for chat. The chat box only shows your own channel's chat, and the test message is the only thing you can add by hand.
Recent events#
Recent events lists the latest follows, subs, resubs, gifted subs, cheers and raids on your channel, newest first. It records them as they happen, so a new source starts empty until something happens.
In the Content tab you can choose which kinds of event to show, how many to show (1 to 20), whether to show amounts such as bits, gifted subs, raid viewers, months and sub tiers, and the layout: a list, or a ticker that scrolls past. If your device asks for reduced motion, the ticker stays still. Under Live controls, Send test event adds a marked sample event and Clear events empties the list.
Show chooses how much of it you see, with a preview of the choice under it:
- List is the list above, and the default.
- Latest only is one line: the newest event of the kinds you chose.
- Biggest this stream is one line: the biggest cheer or gift of the current stream, among the kinds you chose. It starts empty at each new stream, and when you switch to it in the middle of one, because earlier events are not looked at again. Reading events from Twitch needs Twitch connected, with the permissions Bearsong already asks for.
Subathon timer#
Any countdown timer can run as a subathon, which adds time when viewers support the channel. In the timer's Content tab, switch on Add time for subs, gifts and bits, then set:
- the minutes added for a Tier 1, Tier 2, Tier 3 and Prime sub;
- the minutes added per 100 bits;
- the minutes added per gifted sub. A gift bundle counts once for every sub in it;
- a Latest end time, after which no more time is added. Leave it empty for no limit.
Under Add time for you can also add time for follows, raids and chosen channel point rewards. All of it is off until you give it minutes:
- Minutes per follow is added for each new follow.
- Minutes per raid viewer is added for each viewer in a raid, and Most minutes one raid can add caps it, and appears once a raid adds time. If you leave the cap unset, a raid adds at most 60 minutes.
- Channel point rewards lists your own rewards. Tick one and give it minutes, and each redemption adds that time. Redemptions of other rewards add nothing. A timer can use up to 20 rewards. Rewards need a Twitch Affiliate or Partner channel. If Bearsong cannot read your rewards, the ones you saved still show, by a neutral name and their minutes, so you can remove them, and a note says they were not checked.
Follows and raids need Twitch connected, with the permissions Bearsong already asks for.
Pause adding time under Live controls stops time being added without losing your settings, and Resume adding time starts it again. Each amount can be anything from 0 to 10,080 minutes (seven days). Every sub, gift and cheer is counted once, even if Twitch repeats it. The settings apply to every timer you have with the subathon switched on, and while it is on the timer shows a line such as "+5 min per sub" under the clock.
Who added time#
Tick Show who added time to show a line under the clock for a few seconds after a sub, gift, cheer, follow, raid or reward adds time. Write the line yourself with these words in curly brackets: {user} (the viewer, or "Someone" when Twitch gives no name), {time} (such as "10 minutes"), {minutes} (the number), {reason} (such as "sub" or "cheer") and {tier} (such as "Tier 2", for subs and gifts). For example, {user} added {time} with a {tier} {reason} shows "Bear added 10 minutes with a Tier 2 sub". The line always shows the time really added, so when the latest end time stops more being added it shows nothing. Time you add yourself from the live controls shows no line.
How long the stream has been live#
Tick Show how long the stream has been live on any timer to show a second, smaller clock under it that counts up from the moment your Twitch stream started. It starts with your next stream and clears when the stream ends. Words before the stream clock sets the words in front of it, such as "Live for", or leave it empty for the clock alone.
On the Motion tab, Time added and Time removed pick how the clock moves when time changes.
Widgets that follow your stream#
A goal bar, voting bars and a tally can take their numbers from your stream instead of from you. Each option below says what it needs, and none of it changes a widget you leave on By hand.
Goal bar#
Under What moves this goal, choose By hand, New followers, Subscriptions, Bits or A chat counter. For followers and subscriptions, Count is This stream, which starts again at each stream, or All time, which starts from your channel's total on Twitch when you save and keeps counting. Bits count the stream only, because Twitch has no running total of bits.
For subscriptions, a gift of 5 subs counts 5, and resubs count for This stream only. Changing what moves the goal, or what it counts, starts the count again. Putting a goal back on By hand keeps the number.
In Live controls a goal that moves by itself says so ("Moves by itself from new followers, this stream.") instead of showing Add and Subtract. Set by hand is the only control, to correct the number, and the count carries on from it. The bar itself reads, for example, "36 / 50 followers this stream". If Bearsong could not read your total from Twitch when you saved, a notice says why, offers to reconnect Twitch when that is the cause, and shows a field for the starting number. Bearsong tries again when your next stream starts.
A chat counter lists your counters under Chat counter. The goal starts on the counter's number when you save, and the bar fills as the counter goes up. Chat commands, the Counters page, Command Deck and Stream Deck all move it, and its -1, +1 and Reset in Live controls change the counter itself (Reset asks first). There is no Count choice for it. If you have no counters yet, the form links to the Counters page. If the counter is deleted, the goal goes back to By hand and keeps its last number. See Add to your stream goal from chat for the whole set-up.
Voting bars#
Under Votes come from:
- By hand is how voting bars have always worked.
- Chat counts votes from your chat. Viewers type
!vote 2for the second option, counting from the top, while voting is open. You can change the Vote word fromvote. It cannot be a command Bearsong already answers to or one of your own commands or counters, and the form tells you if it is. Each viewer gets one vote a round and their first vote stands. Reset votes starts the next round. Chat voting needs the Twitch bot in your channel. - Twitch poll mirrors the poll running on Twitch. Its choices and votes replace the options while the poll runs (the option editor is hidden), and the bars say when it has ended. You start the poll on Twitch. It needs Twitch connected, with the permissions Bearsong already asks for.
Counter display#
Follow a chat counter lists your counters. A counter display that follows one shows the counter's number and changes with it. Its +1, -1 and Reset buttons in Live controls change the counter itself, so chat, the Counters page, Command Deck and the display always show one number. Reset asks first. Choose No, count by hand to stop following, and the number stays.
The quickest way to add one is Show on stream beside a counter on the Counters page: the studio opens and adds a counter display that already follows it. If the counter is deleted, the display stops following and keeps its last number. Chat commands that change the counter need the Twitch bot.
When the scene looks right, add it to OBS.
Video layers#
In Studio, open Add to scene, find Video under Text and media, and add it. Select Upload WebM in the layer’s Content tab. Use a VP8 or VP9 WebM up to 4.4 MB in a connected workspace. Resize and place the layer like any other layer. It appears through the scene link you already use in OBS.
Loop video is on for new layers. Leave it on for animated backgrounds and ending screens, or turn it off to play once and hold the last frame. A video starts from the beginning when you show its layer. For a smooth visual join, use a clip authored to match at the end and beginning.
Studio previews are muted. Clear Mute in OBS to play the clip’s audio on the scene’s browser source. Stop or hide the video when you are finished with it.