

Overlay studio
Build overlay scenes in the Bearsong studio: start with a ready scene, arrange widgets on a canvas, share them between scenes and pick a scene size.
Live and chatLast updated
Overlays put your stream's extras on screen: a countdown before you start, a goal bar, a raffle wheel or an alert when someone subscribes. You make each one in Bearsong and add it to OBS as a browser source.
Open Stream > Overlay studio. That page is the Overlay studio. Its tabs are Scenes, Alerts, Sound alerts and OBS docks, and Scenes is where you build scenes. Sound alerts have their own guide.
Add compatible third-party widgets to the same scene with a Web page layer.
Looking for something else? See Overlay widgets and theme packs, Stream alerts or Add overlays to OBS, which also covers OBS docks.
Keep your links private
Each scene, widget and alert has its own private link. Anyone with a link can show it, so do not paste it in chat or screenshots.
Start with a ready scene#
With no scenes and no widgets yet, the studio opens on Your first scene in one click. It shows four theme packs, each as a small preview of the scene it makes: Tidepool, Arcade neon, Paper cut and Cosy cabin. Tidepool is chosen to begin with.
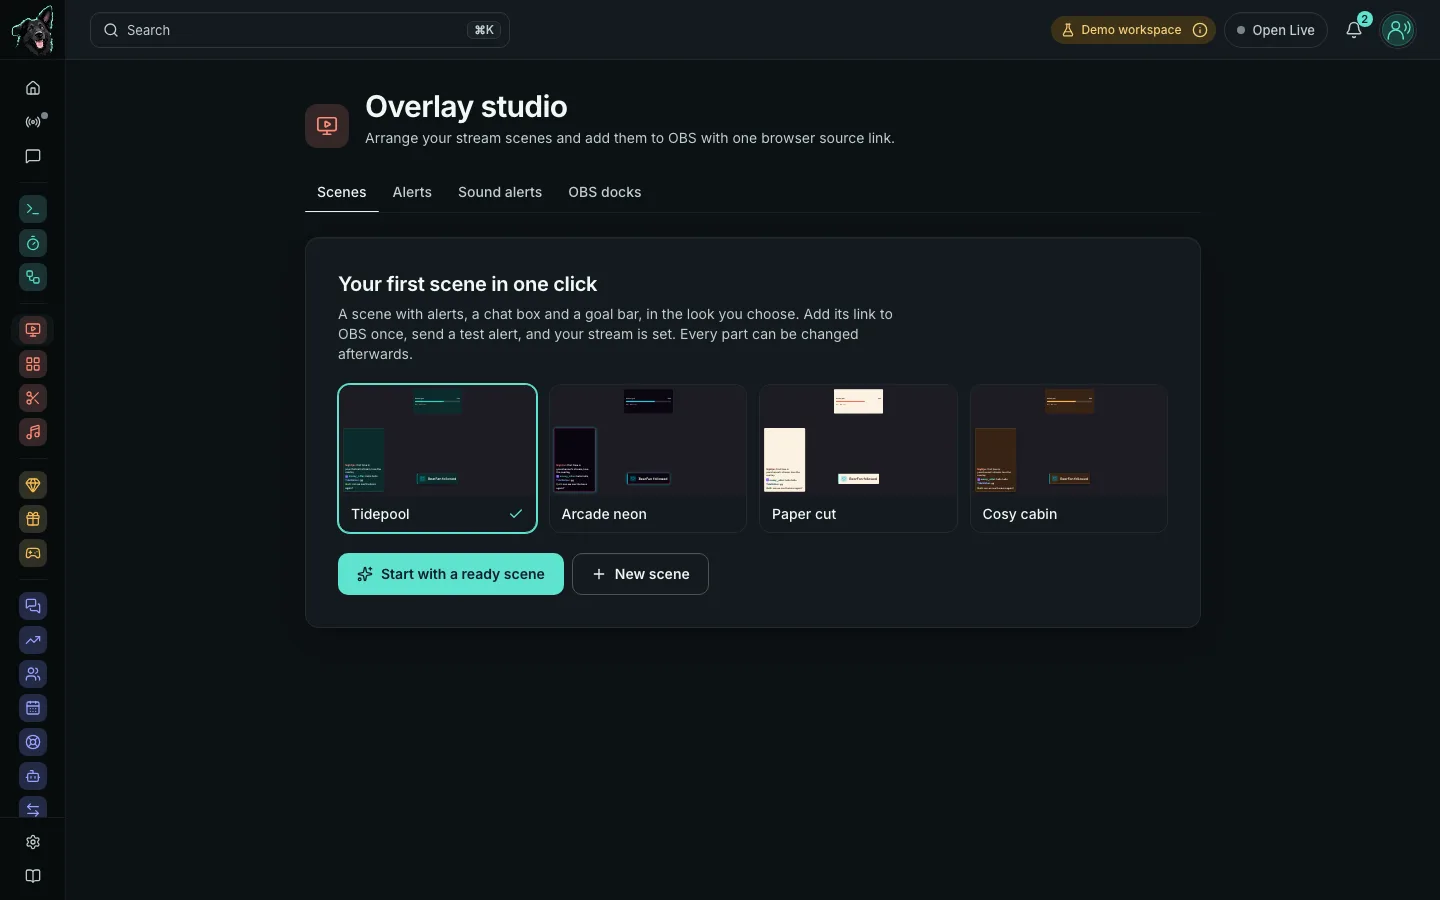
- Choose a theme pack.
- Choose Start with a ready scene. Choosing it again within a minute for the same pack (a double click, say) gives you the scene already made, never a second one.
- The scene opens in the editor with a Your scene is ready strip above the stage. Choose Copy link and paste it into a Browser source in OBS once, at 1920 × 1080 (see Add overlays to OBS). The link is also on the Browser source card at the foot of Layers.
- Choose Send test alert on the strip to send a follow alert and see it in OBS. Until Twitch is connected, the button is a Connect Twitch to test link instead.
- Choose Dismiss (the ×) when you are done. The strip never comes back for that scene.
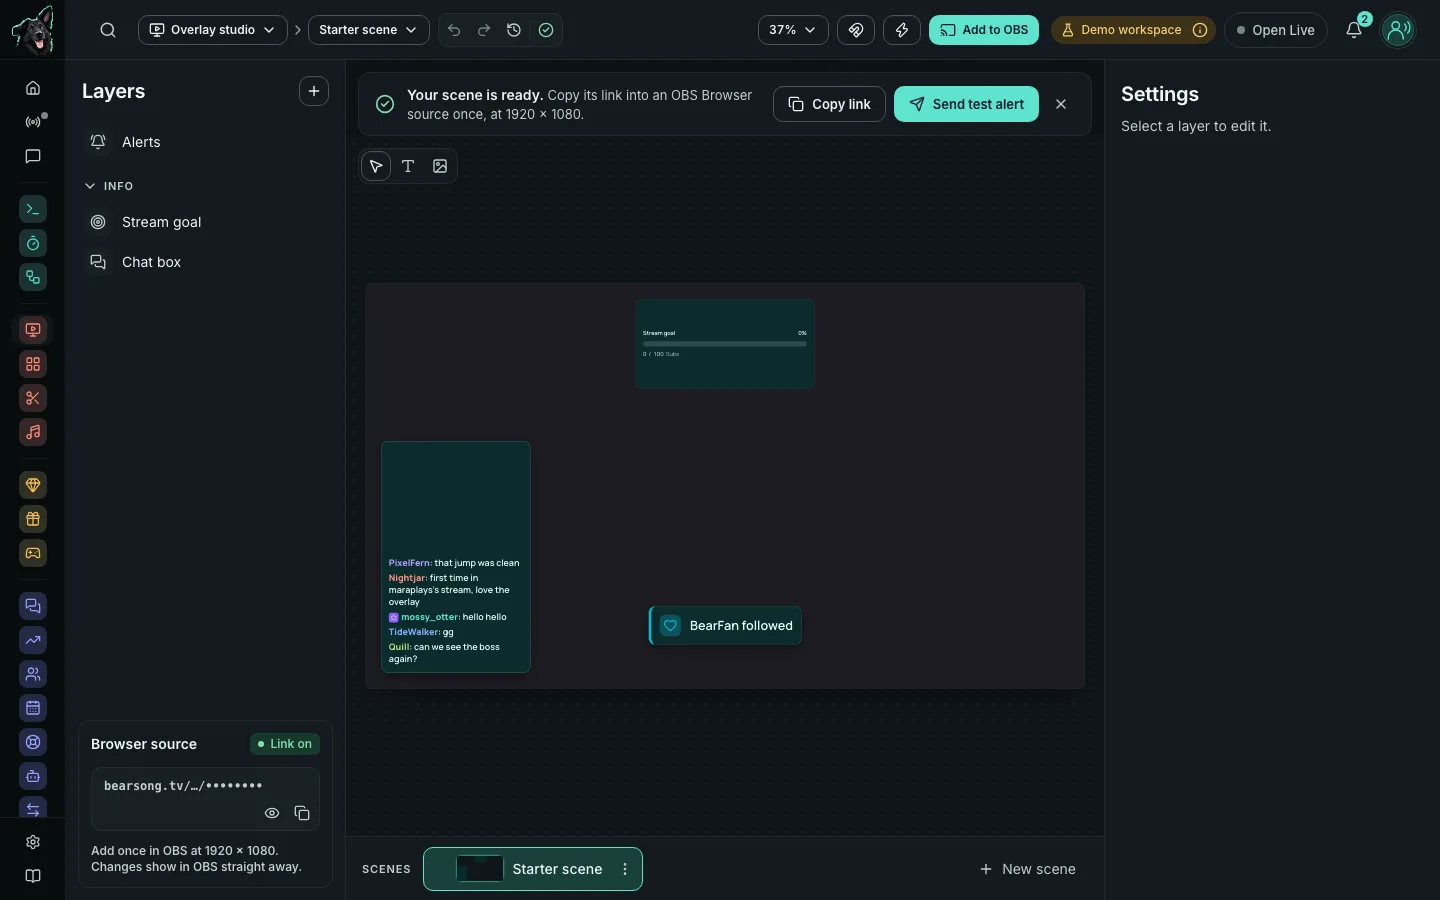
The scene is called Starter scene (Starter scene 2 and so on if you already have one by that name), and is 1920 by 1080. It holds your alerts over the whole canvas and on top, a goal bar centred at the top and a chat box down the left, all switched on. The chat box and goal bar take the pack's look. If you already have an alerts overlay it goes into the scene as it is, in its own style, and is switched on if it was off. You only ever have one. On a phone the same strip shows above the scene picker, without the Copy link button: it points to the Browser source field further down. When the scene opens, the strip is announced to screen readers and takes focus; when you dismiss it, focus moves to the stage (or, on a phone, the scene picker).
New scene, next to the main button, starts from a blank canvas instead. If you already have widgets but no scenes, the studio makes a first scene called Main from them, as it always did. Once you have a scene, New scene on the scenes bar offers Start with a ready scene in the same window: choose it, pick a look and the window makes the scene. If you have reached the scene or widget limit, the window says so and makes nothing.
Build a scene#
A scene is one canvas that holds the widgets you want on screen together. It is 1920 by 1080 pixels unless you choose another size when you make it (see Scene sizes). The stage shows each widget the way OBS draws it.
- Open Stream > Overlay studio. The Scenes tab opens the scene editor.
- In Layers, choose +. The Add to scene window opens. Choose Add on a widget (see Add to scene). Your alerts are in the list too.
- Drag the widget on the stage to move it, or drag a handle to resize it. Hold Shift to keep its shape.
- In Settings, change what it says, how it looks and how it moves. Settings appears when a layer is selected.
- Check the top bar says Saved, live in OBS. Changes save a moment after you stop.
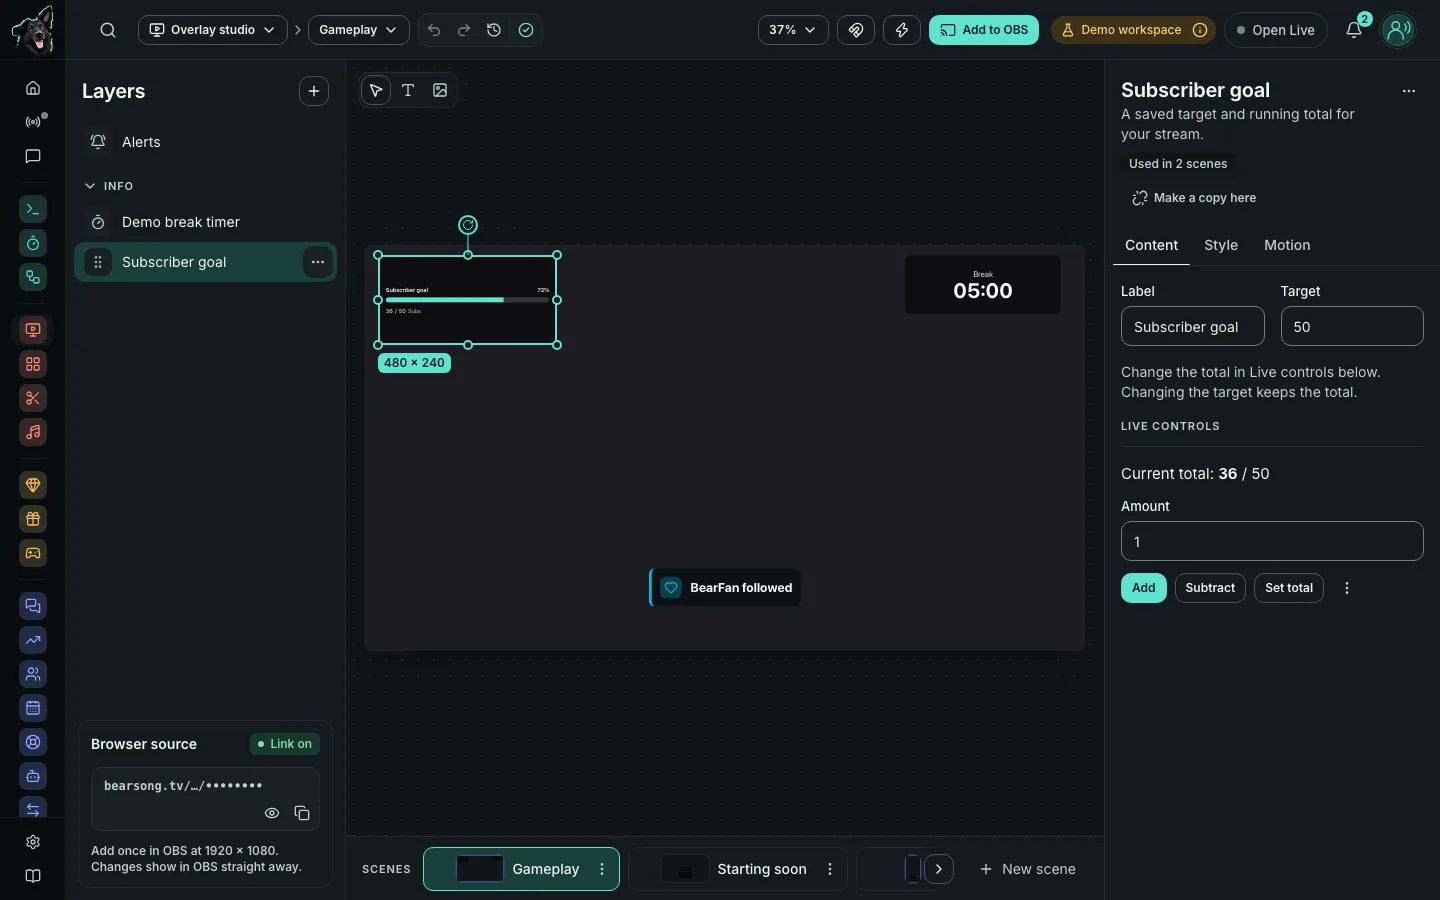
What each part does:
- Layers lists the widgets in three groups: Alerts, Widgets (goals, timers, chat and the other live information) and Media (images, video, web pages, stickers and shapes), each with its icon and full name. Select a layer to change it, or double click its name to rename it. Each row has one ⋯ menu, shown when you hover, focus or select it: Rename, Duplicate and Export widget (for widgets made in the studio), Copy, Paste and Paste as new copy, Make a copy here (only when the widget is in other scenes too), Copy widget link, Move up, Move down, Bring to front, Send to back, Hide or Show, Lock or Unlock, Rotate 90 degrees and Reset rotation, Remove from scene and Delete widget. The same list opens when you right click a layer, and from the ⋯ beside the title in Settings. A layer that is hidden or locked shows a small eye or lock, and clicking it turns it back on. Drag a layer by its grip to change what sits in front, or use Move up and Move down. Remove from scene keeps the widget so you can add it again; Delete widget deletes it from every scene after you confirm, and the window says how many scenes it is in. Alerts, Goose Quest and sound alerts can only be removed from the scene.
- The stage snaps edges and middles to the canvas and to each other, with pink guides. A turned layer snaps by the outline that holds it. Hold Alt to move freely, or switch the Snapping button beside the zoom menu off. With a layer selected, the arrow keys move it one pixel, or ten with Shift. See Turn, copy and arrange layers and Zoom and move the canvas.
- Settings appears only when a layer is selected. With nothing selected, the stage uses the whole width. It has three tabs and always opens on Content. Content is what the widget says, with its live controls. Style has looks (Glass, Neon, Minimal and Comic, and any you saved), text, colour, shape and position, with rotation and opacity under position. Motion sets how it enters, leaves and idles. For the Alerts layer, Content shows how many of the ten alert types are on, with Edit alert types to open the Alerts page and a Test button. Which alert types are on, and their minimums, are set on the Alerts page. On a screen narrower than 1280 pixels Settings opens over the stage when you select a layer, and Close settings puts the stage back.
- Scenes along the bottom are where you switch scenes, and where you create, rename, copy, resize, reorder and delete them. Every scene has its own link.
- An empty scene shows Nothing in this scene yet in the middle of the stage, with an Add to scene button. The layers panel says Add a widget to see it here.
- On the stage, the Alerts layer is drawn as a sample alert at the foot of the canvas. When it is selected, a dashed outline shows its full area and the label Alerts appear here.
- Undo and redo (Cmd or Ctrl and Z, and Shift with it) cover every change. History, beside them in the header, lists them. Delete or Backspace removes the selected layer from the scene, and the message that follows has an Undo button.
Turn, copy and arrange layers#
Rotate and fade. A selected layer has a round handle above it. Drag it to turn the layer about its middle: the angle shows beside the layer, and holding Shift snaps it to 15 degrees. In Style > Position, Rotation (minus 180 to 180 degrees) and Opacity (0 to 100 percent) take exact numbers, and the layer menu has Rotate 90° clockwise and Reset rotation. OBS draws exactly what the stage shows. A turned layer is picked, outlined and selected by its real shape. Its resize handles work along its own edges, so a turned bar still gets longer along itself. The alerts layer covers the whole canvas and can be faded but not turned. These two settings need the latest Bearsong service; until it is in place the controls are hidden.
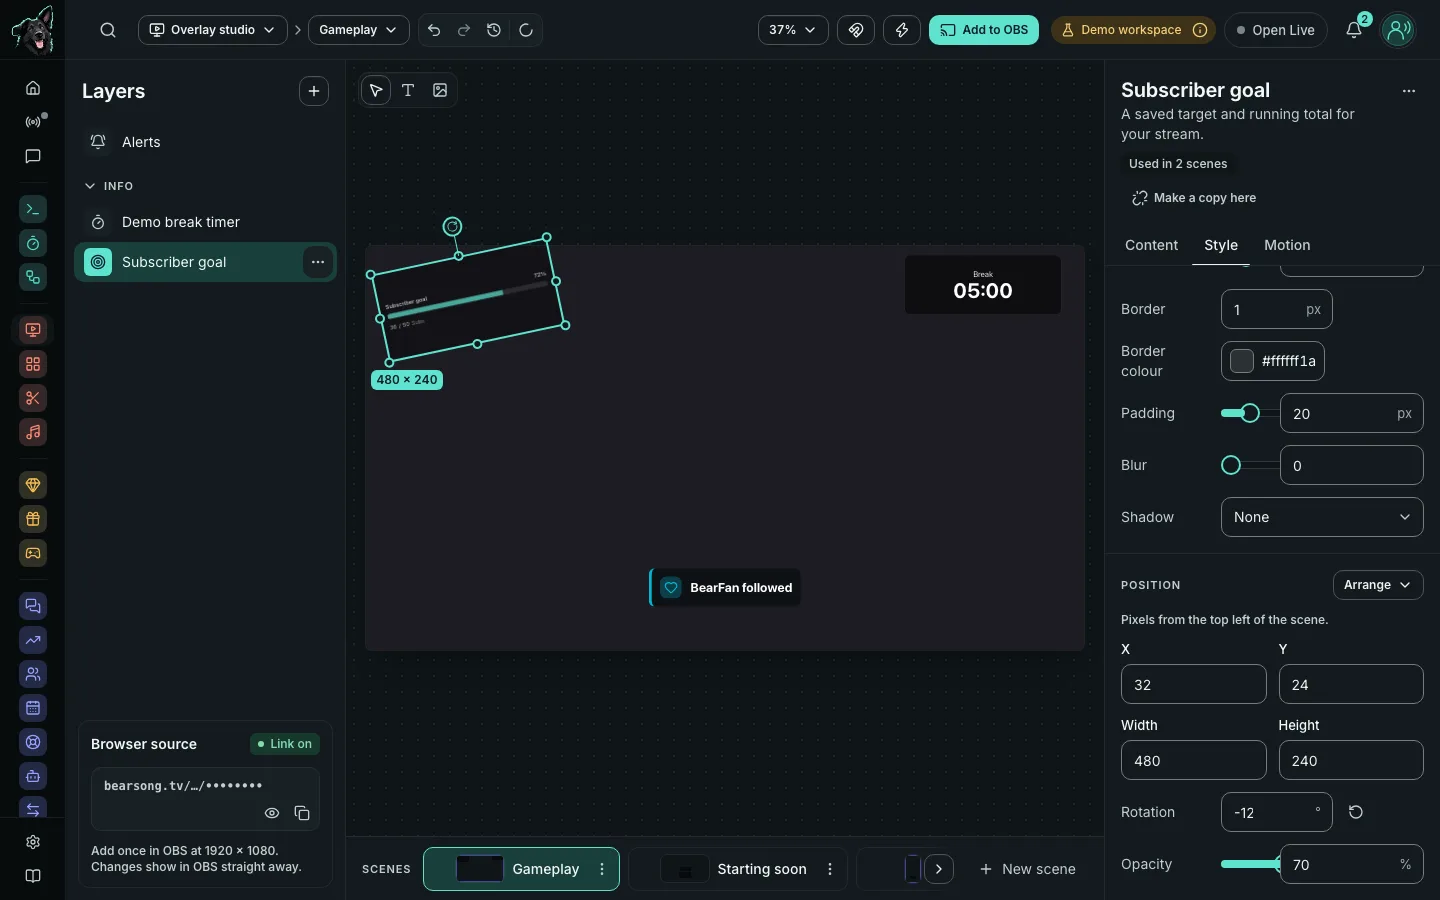
Copy, paste and duplicate. Cmd or Ctrl and C copies the selected layers, Cmd or Ctrl and V pastes them, and Cmd or Ctrl and D duplicates them. The same actions are in the layer menu, and in Settings when several layers are selected. A paste into another scene shows the same widgets, shared: change one and every scene that uses it changes, and Settings says Used in 2 scenes. A scene holds a widget only once, so pasting into the scene a layer came from makes a copy of the widget instead, a little to one side. Paste as new copy (Cmd or Ctrl, Shift and V, or the menu) always makes widgets of their own. Alerts, Goose Quest and sound alerts exist once and stay shared. A scene that already has its alerts layer does not paste a second one, and a full scene says so. Each paste or duplicate is one undo step. Undo removes the layers from the scene. Any new widget copies stay in the widget library and still count towards your widget limit. Nothing is copied or pasted while you are typing in a box.
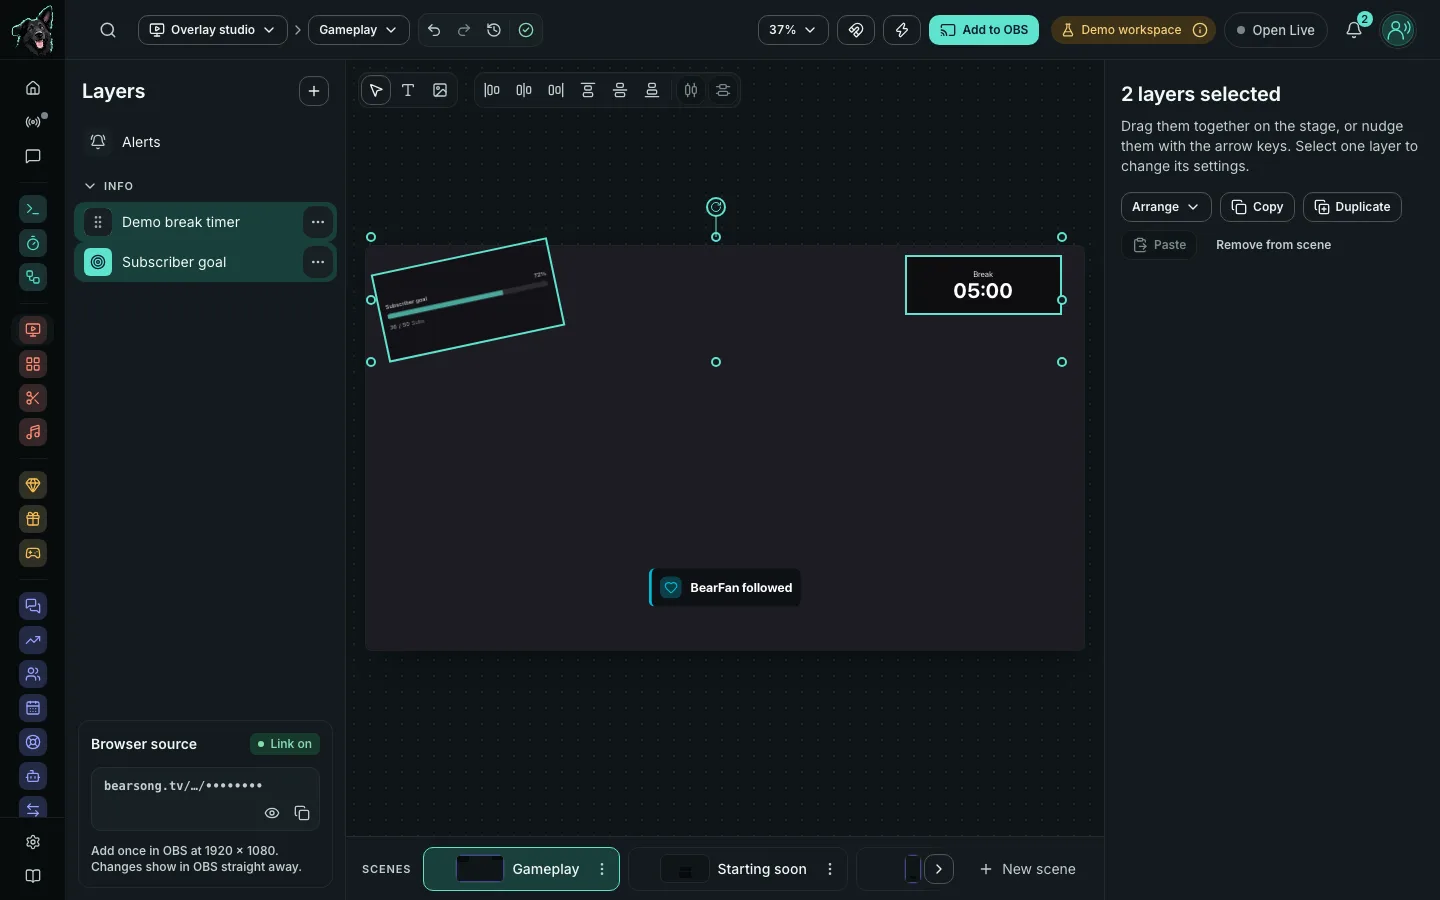
Align and distribute. Select two or more layers and a small group of buttons appears at the top of the stage: align left, centre, right, top, middle and bottom, then distribute horizontally and vertically (three or more layers; the two at the ends stay put). Layers line up with the outline that holds them all. With one layer selected, Arrange in Style > Position lines it up with the canvas instead. A locked layer, and the alerts layer, never move. Each is one undo step.
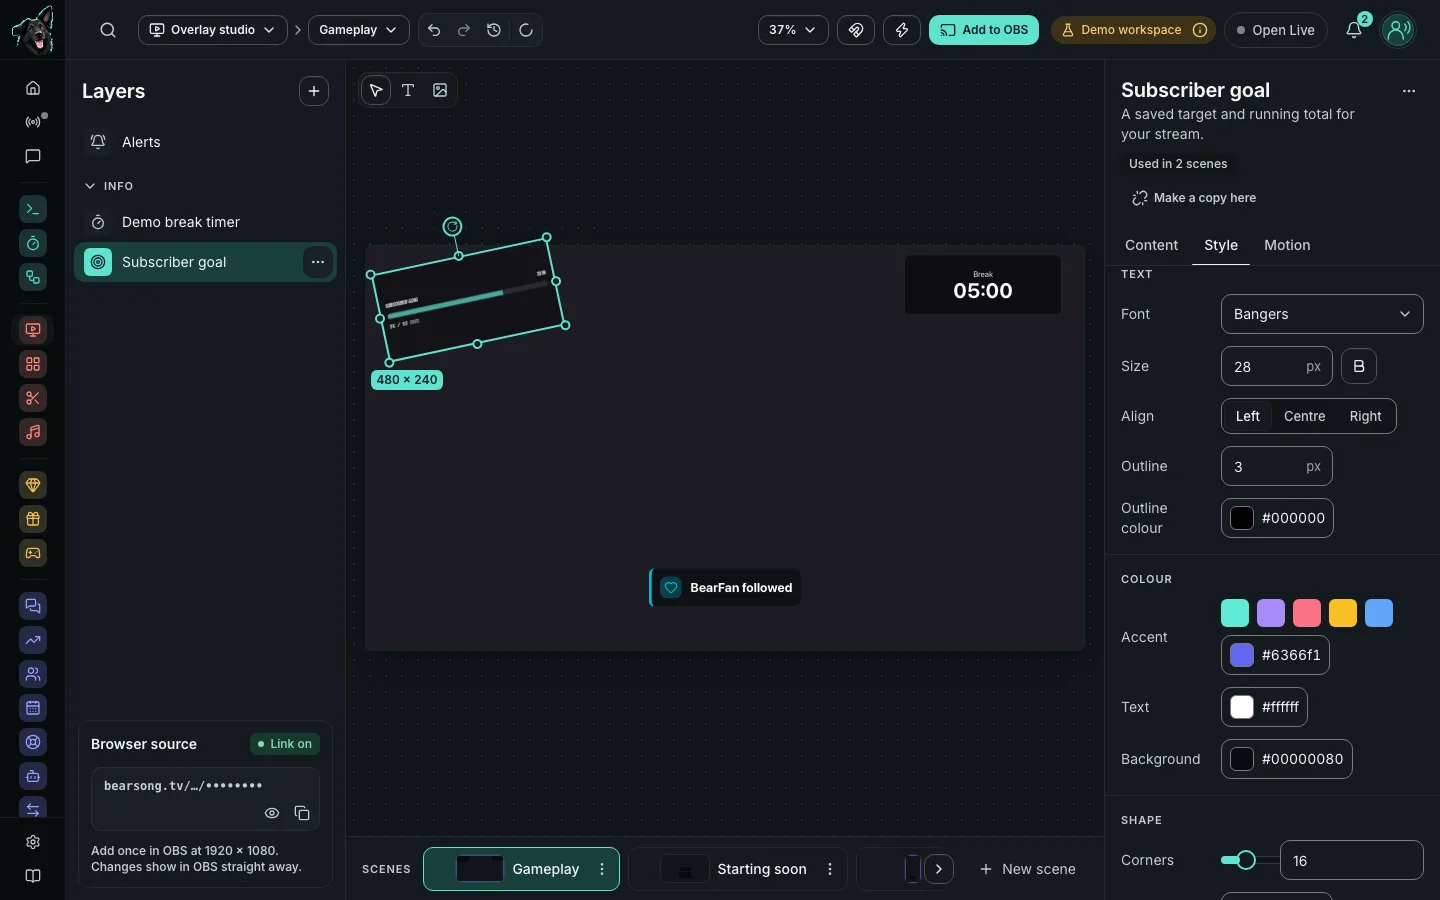
More text styling. Twelve fonts are built in, all self-hosted with open licences, so OBS needs no outside font service: Inter, Manrope, Space Grotesk, Fredoka, Montserrat, Oswald, Bebas Neue, Bangers, Playfair Display, Pacifico, JetBrains Mono and Press Start 2P. Under Style, Outline draws a coloured line round every letter. Widgets with a box also have Border width and colour, and Padding. Bebas Neue, Bangers, Pacifico and Press Start 2P have one weight only, so the Bold button has no effect on them.
Zoom and move the canvas#
Hold Cmd or Ctrl and use the mouse wheel to zoom about the pointer, or pinch on a trackpad. Zoom stops at 10 and 200 percent. The zoom menu shows the number, and Fit returns to the whole canvas. To move a zoomed canvas about, hold Space and drag, drag with the middle mouse button, or scroll. A plain wheel scrolls only the stage, and nothing outside it is touched. The shortcuts window (press ?) lists these keys under In the overlay studio.
The top bar, new widgets and saving#
On computers and wide tablets (1024 pixels and up), the left of the top bar is a breadcrumb. The Overlay studio menu lists Scenes, Alerts, Sound alerts and OBS docks, and the scene name menu beside it holds the scene actions: Rename scene, Duplicate scene, Canvas size, Export scene and Delete scene. Next come undo and redo, the save status, the zoom menu (Fit and 25 to 200 percent, or any zoom between 10 and 200 percent from the mouse wheel), a Snapping button, Test event and Add to OBS. On a narrower window the labels become icons. The select, text and image tools float at the top left of the stage.
The save status says Saved, live in OBS when everything is saved. Otherwise it says Saving, or Couldn’t save with a Try again button.
A new widget goes in the middle of the scene, or in the free space nearest the middle, and is selected for you.
If you changed a scene somewhere else too, the studio asks whether to reload the latest or keep your changes. It never overwrites quietly. On a phone or a small tablet the page shows its title and the four tabs. You can't arrange widgets there, but the Scenes tab has a scene picker, the Browser source link field, one list of layers with their Live controls, and a Test event picker with a Send test button.
#
A widget belongs to your workspace, and a scene only says where it sits. When a widget is in more than one scene, choosing it shows Used in 2 scenes (or however many) under its name. Choose that label to see which scenes. It is a neutral grey chip. Changing the widget's content or style changes it in all of them, and so does applying a theme pack or a look. Where it sits, how big it is, whether it shows and whether it is locked belong to each scene.
To change a widget for one scene only, choose Make a copy here, next to the label or in the layer's menu. The scene's layer moves to a new copy in the same place, and the other scenes keep the original. Undo switches the scene back to the original and keeps the copy in your widgets, so nothing is deleted. Alerts, Goose Quest and sound alerts exist once and always stay shared. Their label explains: “You have one of these, so every scene shows the same one.”
When you Duplicate a scene you choose how its widgets are treated. Share widgets with the original is the default: both scenes use the same widgets. Copy widgets so this scene is independent gives the new scene its own copy of each widget, and never changes the original. Alerts, Goose Quest and sound alerts stay shared either way. If anything goes wrong while copying, nothing is left behind and the message says so.
Scene sizes#
New scene asks for a name and a size (or offers a ready scene, which is always 1920 by 1080): 1920 by 1080 (the default), 1280 by 720, 2560 by 1440, or 1080 by 1920 for a vertical stream. Set the same width and height on the scene's OBS browser source. New widgets are placed to fit the scene's size, and alerts or Goose Quest fill the whole canvas.
To change the size of a scene you already made, open its ⋯ menu on the scenes bar (or the scene name menu in the top bar) and choose Canvas size. Nothing is moved or resized for you, so a layer that now reaches past the edge is cut off in OBS until you bring it back in. The window tells you how many layers that is before you confirm.
Export and import#
To move work between accounts, or keep a copy:
- For one widget, open the menu beside its name in Settings and choose Export widget. For a scene, open the scene name menu in the top bar, or the menu on its tile in the scenes bar, and choose Export scene.
- In the other account, open Add to scene, choose Import a widget and drop the file. Import takes a widget or scene file exported from Bearsong.
- Check the list of what will be added, then choose Add to scene.
Imported widgets are new widgets with their own links. Your uploaded pictures and live state are not included, so add pictures again. Alerts, Goose Quest and sound alerts are linked to the ones you already have. Bearsong checks every file before it adds anything: only files exported from Bearsong, up to 512 KB, with widgets it knows, are accepted, and it tells you why when one is refused.
More overlay guides#
- Overlay widgets and theme packs: add widgets to a scene, restyle it with theme packs and saved looks, upload pictures, and set up the chat box, recent events and the subathon timer.
- Stream alerts: show follows, subs, cheers, raids and reward redemptions, check that they will play and control the queue.
- Add overlays to OBS: add a scene to OBS as a browser source, test it and put Bearsong tools in OBS as docks.